The blog
How to Add Embroidery Personalization to Your Shopify Store (2026 Guide)


Embroidered products carry a price premium of 30–50% over their plain equivalents (Deloitte, Made-to-Order Consumer Study), but they also create a checkout problem. Shoppers want to know exactly what their initials will look like, in which thread colour, in which position, before they hit 'Add to cart' — and Shopify's default product page doesn't show them any of that.
This guide walks through how to add real-time embroidery customisation to a Shopify store in under 30 minutes — covering app setup, pricing rules for extra characters, production-ready file delivery to your embroidery partner, and the operational details most stores miss until orders start coming in.
Quick summary
To add embroidery customisation to Shopify:
- Install a Shopify personalisation app that supports embroidery rendering with real-time previews
- Upload your product image and define the embroidery zone (where the stitching can go)
- Set the available thread colours, fonts, and character limits
- Set up pricing rules — most stores charge per character or a flat add-on fee
- Test the configurator on your storefront with a real order
- Connect production-ready file delivery to your embroidery fulfilment partner
The full step-by-step is below.
Why embroidery is harder than printed personalisation

Most Shopify personalisation apps were built for printing — flat designs on flat surfaces. Embroidery is fundamentally different:
- Thread thickness matters. A 2-character monogram at 1 inch will look completely different to the same 2 characters at 0.5 inches. Most apps can't accurately render thread weight.
- Background colour shows through. Embroidered text on a navy hoodie reads completely differently from the same text on a white hoodie. The preview has to account for both.
- Curvature and stretch. Letters embroidered on a curved cap or a stretchy fabric distort. The preview has to anticipate that distortion or it will mislead the shopper.
- Production constraints. A character limit isn't a soft suggestion — most embroidery machines have a maximum stitch count per design. Exceeding it means the file is rejected by your fulfilment partner.
A good Shopify embroidery app handles all four. A poor one shows the shopper a generic preview, then a different product arrives in the mail. Refund rates on poorly-implemented embroidery customisation regularly exceed 8–12% — versus under 1% with accurate live previews.
Step 1 — Install a Shopify personalisation app that supports embroidery
Not every personalisation app handles embroidery well. The shortlist of apps with genuinely accurate embroidery rendering on Shopify in 2026:
AppEmbroidery renderingLive previewSetup timeBespoStitched-effect rendering with thread thicknessReal-time~5 minZakeke3D-capable but needs modellingReal-time30–60 minCustomilyFlat overlay, not true stitch effectReal-time1–2 hrsTeeinbluePrint-style preview, not stitchedReal-time1–2 hrs
For most stores, Bespo is the fastest path to a production-quality embroidery experience — the rendering simulates actual thread thickness and shows how the stitching will look against your specific product colour. Install from the Shopify App Store and you'll be in the editor within 90 seconds.
The remaining steps below apply to any app, but examples reference Bespo.
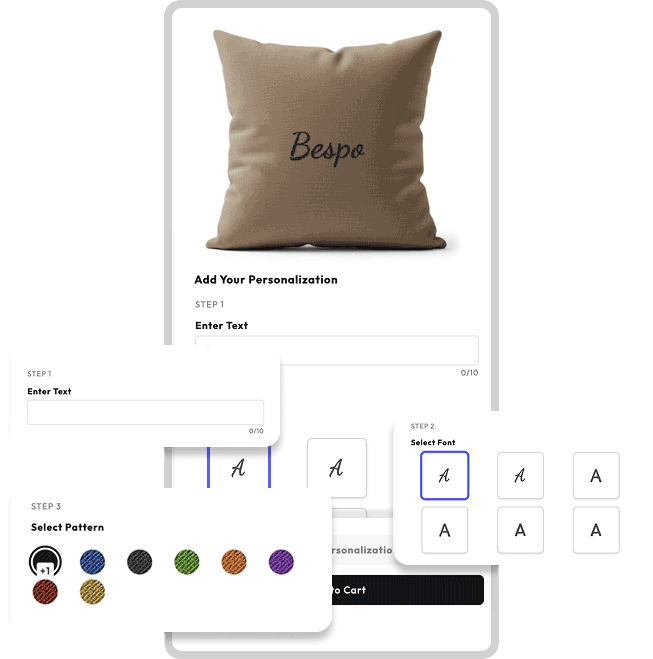
Step 2 — Define the embroidery zone
In your personalisation app's editor:
- Upload a high-resolution image of the product (at minimum 2000×2000 pixels, ideally with a transparent or neutral background)
- Define the rectangular area where embroidery can appear — for a hoodie, this is typically left-chest (2.5 × 2.5 inches) or back-yoke (10 × 4 inches)
- Set the safe margin — the buffer inside the zone where text won't be clipped by seams or edges
Tip: photograph your product from straight-on with even lighting before defining the zone. Angled photos make alignment inaccurate and shoppers will see their monogram floating off-centre.
Step 3 — Configure thread colours, fonts, and character limits
This is where most stores cut corners and pay for it later in returns. A good embroidery configuration includes:
Thread colours. Offer 6–12 thread options, not 40. Pantone-matched swatches with visible thread texture, not flat colour blocks. Make sure each thread colour you offer is actually stocked by your embroidery partner — nothing kills an order faster than receiving a 'we don't carry that thread' email three days after purchase.
Fonts. Limit to 3–5 embroidery-friendly fonts. Avoid anything with strokes thinner than 1.5mm at the smallest embroidery size you'll offer — thin strokes simply can't be stitched accurately. Good defaults: a clean sans-serif, a classic serif, a script font.
Character limits. Set a hard maximum based on embroidery zone size:
- 1 inch tall × 2 inch wide zone → 2–3 characters max
- 1 inch tall × 4 inch wide zone → 8–10 characters
- 2 inch tall × 6 inch wide zone → 12–15 characters
If shoppers can type more characters than your embroidery machine can produce, you've built a refund pipeline.
Position and alignment. Allow shoppers to pick left, centre, or right alignment within the zone. Do not allow free-drag positioning — it produces wildly inconsistent orders that confuse your fulfilment partner.
Step 4 — Set up pricing rules
Embroidery pricing on Shopify is typically structured one of three ways:
Flat add-on. Most common. 'Add embroidery for $8' — same price regardless of character count. Easy for shoppers to understand. Best for products where the embroidery is always a similar size (e.g., monogram on a tote bag).
Per-character. '$1.50 per character.' More accurate for cost recovery if your fulfilment partner charges per stitch. Riskier for conversion — shoppers who type 20 characters and see a $30 surcharge often abandon.
Tiered. '1–4 characters: $5. 5–12 characters: $10. 12+ characters: $15.' Best of both worlds — predictable for shoppers, accurate for your margin.
In Bespo and most modern apps, pricing rules update in real-time as the shopper types. Configure these rules in the personalisation app, not as separate Shopify products — keeping personalisation as a property of the parent SKU means inventory and analytics stay clean.
Step 5 — Test the configurator on your storefront
Before going live:
- Open your product page in an incognito window
- Type the longest name you might receive (think 'Maximilian Alexander Hugh' — embroidery is a common gift purchase and gift recipients sometimes have long names)
- Try every thread colour and font combination
- Place a real test order (with your own card) and confirm: the order line item shows the personalisation data clearly, the production-ready file is attached to the order, the price calculation matches what the shopper saw on the product page
If anything doesn't match — most commonly, the file delivered to fulfilment uses a different font or colour than the preview showed — fix it before letting real orders through.
Step 6 — Connect production-ready files to fulfilment
This is the operational detail most stores miss until orders pile up.
When a customer orders an embroidered product, your embroidery partner needs a production-ready file — typically a DST or PES file (the file formats embroidery machines actually read), or at minimum a high-resolution SVG or vector PDF.
A good personalisation app generates these automatically and attaches them to the Shopify order. In Bespo, the production file is available in the order's line-item properties and can be sent automatically to fulfilment partners via the Shopify API or Zapier workflows.
Don't: email production files manually. It's the largest single source of fulfilment errors at this stage of operations.
Do: integrate with your embroidery partner's order management. Most full-service embroidery partners accept Shopify webhook-triggered file delivery.
How much can I charge for embroidery on Shopify?
For most product categories, embroidery add-on pricing in 2026 sits roughly here:
Product typeTypical add-on priceCost to fulfil (avg)Cotton t-shirts, totes$5–$8$2–$3Hoodies, sweatshirts$8–$12$3–$5Caps and beanies$5–$10$2–$4Leather goods (small accessories)$15–$30$5–$10Towels and linens$8–$15$3–$6
For premium products (full-grain leather, high-end accessories) you can charge significantly more — embroidered monograms on leather goods regularly add 20–40% to the order value with strong perceived value justification.
Frequently asked questions
Do I need a Shopify Plus subscription to add embroidery customisation?
No. All major Shopify personalisation apps including Bespo work on Shopify Basic, Shopify, Advanced, and Shopify Plus. Shopify Plus offers a few advantages for high-volume embroidery operations (better checkout customisation, higher API limits) but is not required.
Can I add embroidery to existing products without creating new SKUs?
Yes — and you should. Personalisation belongs as a property of the parent product, not a separate SKU. This keeps inventory accurate, analytics meaningful, and avoids exploding your product catalogue. Bespo and similar apps handle this by adding personalisation data to the line-item properties of the existing SKU.
What's the difference between embroidery and monogramming on Shopify?
Monogramming is a subset of embroidery — typically 1–3 letters in a decorative font, often used for gifts. The technical setup is identical; monogramming usually involves shorter character limits, a more limited font palette (script fonts dominate), and higher per-character pricing because of the perceived gift premium.
How do I handle returns on personalised embroidered products?
Most Shopify stores selling embroidered customisation set a no-return policy for personalised items — this is industry standard and legally defensible if disclosed clearly on the product page. Add the disclosure both on the product page and in the customisation flow before checkout.
Will adding an embroidery configurator slow down my Shopify store?
It depends on the app. Bespo loads asynchronously and shows no measurable change to product page Core Web Vitals after installation. Older personalisation apps can add 200–800ms to product page load time. Run PageSpeed Insights before and after installing any new app and measure the actual impact on your store.
Can I offer embroidery on Print-on-Demand products?
Yes — Printify, Printful, and Gelato all offer embroidery on apparel and accessories. The personalisation app you choose needs to integrate with your POD partner so production-ready files are delivered automatically.
Ready to add embroidery to your Shopify store? Bespo offers a 14-day free trial with full embroidery rendering and real-time pricing — no credit card required. Start your free trial or book a 30-minute demo to see Bespo configured on your own products before committing.